Panasonic's designers deliberately gave the LX100 a "retro" style control layout with top/rear shutter button location, mini handle, aperture ring on the lens and shutter speed dial on top of the body. My time and motion studies have shown that operating a camera with this arrangement requires more actions and more complex actions than are required with a well implemented version of the modern layout using ergonomic handle, mode dial and control dial arrangement.
As soon as I saw photographs of the LX100 I realised there is an alternative, more ergonomically efficient way to implement the same concept, within the same envelope of dimensions.
Basic Principles There are four phases of camera use: Setup, Prepare, Capture and Review.
Prepare Phase is the few minutes before making photos. This is the time to make camera settings for the prevailing conditions and the photographic task ahead.
A very useful type of control module in this phase is the set and see dial, lever, switch or ring. This means a module with marked settings which can be seen by looking at the outside of the camera.
This type of control module is invisible in Capture Phase when one is looking through the viewfinder (or at the monitor but not anywhere else on the camera body) in the process of taking pictures. So the main appeal of such modules (that the user can see the settings on picking up the camera) becomes irrelevant when the user is in the process of making photos.
A well implemented camera allows all primary and secondary exposure and focus parameters to be seen and adjusted in Capture Phase while continuously looking through the viewfinder and without having to change grip.
Best use for set and see modules If primary exposure parameters such as aperture, shutter speed and ISO are allocated to set and see modules the setting has to be duplicated in the viewfinder/monitor. But if settings for these parameters are visible in the viewfinder/monitor they are redundant on set and see modules. The opportunity cost is that Prepare Phase settings cannot be allocated to those same modules.
Readers unfamiliar with my ergonomic language might like to click on the Basic Concepts page at the top of this blog and review the many posts listed there.
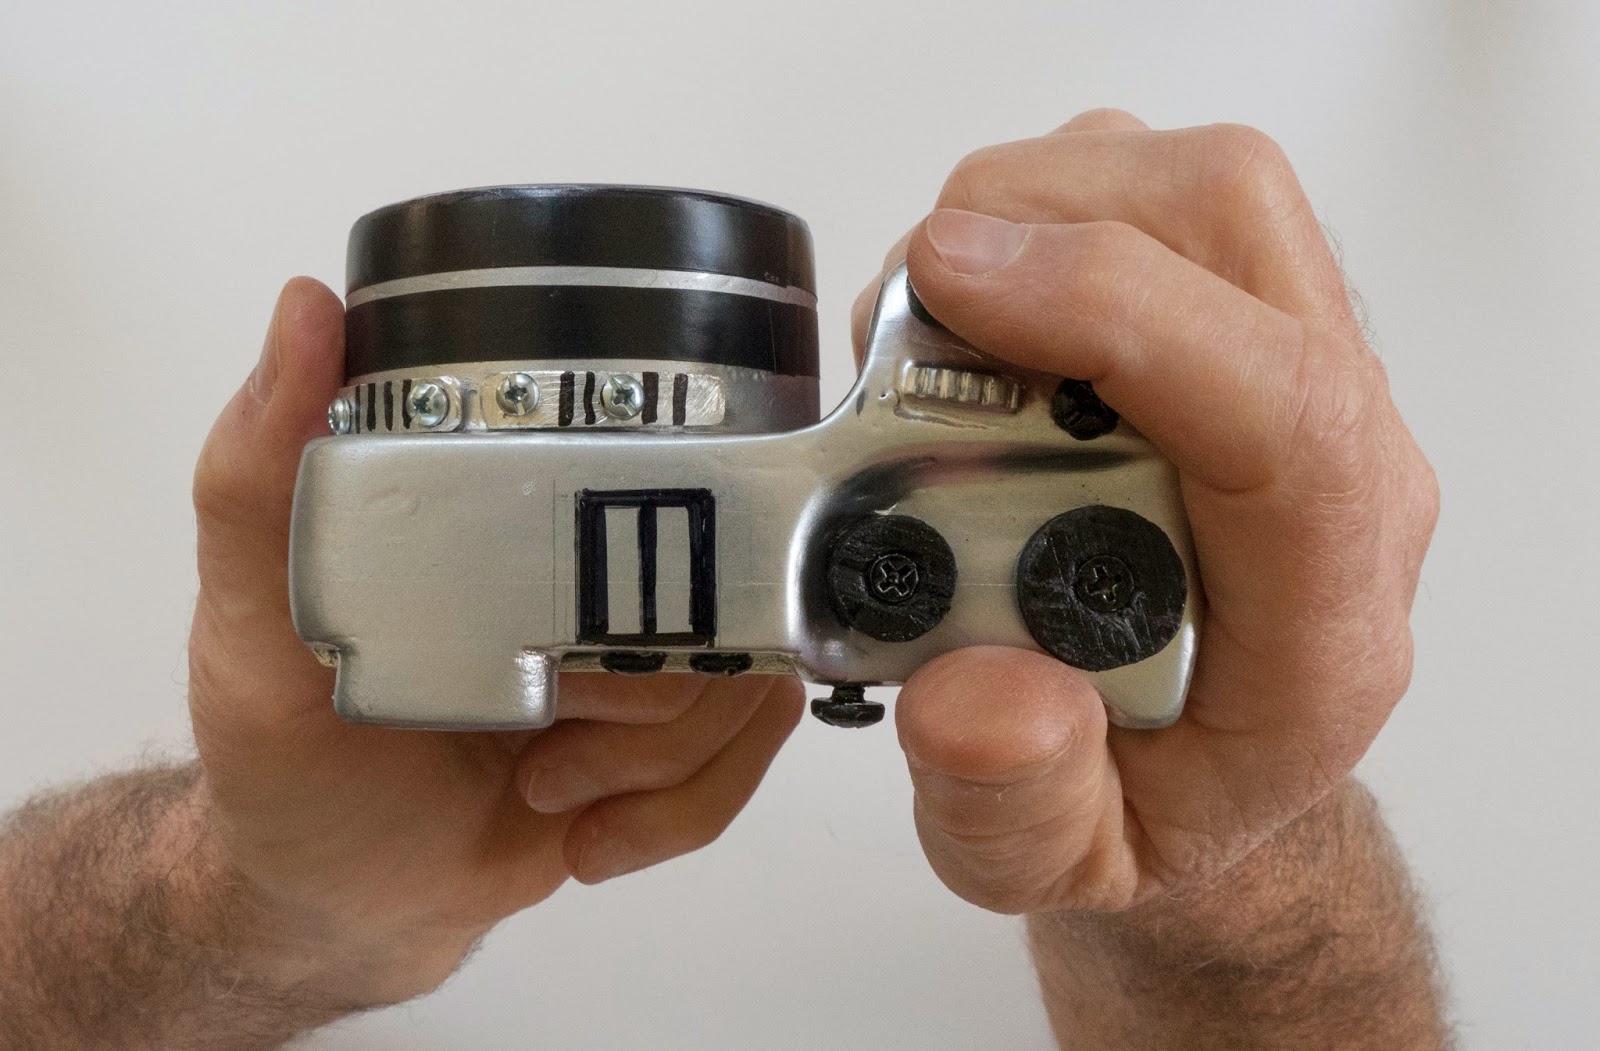
Getting the ergonomics right The mockup illustrated in this post is my vision of the ideal camera built within the dimensional envelope of the LX100. It has the same width, height and depth. But you can see the layout is very different. The handle makes the mockup appear larger than the LX100 but they share the same width, height and depth.
The lens has been moved across to the left leaving space for a fully sculpted ergonomic handle on the right. I assume this is technically feasible as several Sony NEX cameras have this relationship between the body, lens and EVF.
On top of the handle is a shutter button, control dial and two buttons with user allocated function. I would use one for ISO and the other for Exposure Compensation. This arrangement allows for the ergonomically optimal shutter button forward position with the right hand in the half closed/relaxed posture.
Adjustment of aperture/shutter speed (depending on the Mode Dial position), ISO and exposure compensation is very fast, requiring just one finger which has to move no more than 11mm. Both hands hold the camera securely and steadily while these adjustments are made.
The alt button allows the function of a dial or other button to be switched to any user preset alternate function. It is easily reached by the fourth finger of the right hand without disrupting the grip.
The two set and see dials on top are for Drive Mode and Main Capture Mode.
The largish protruding button just to the left of the thumb is a JOG lever for direct control of AF box position.
Including the 4 way controller on the camera back there is a total of 10 buttons, each with user allocated function.
The monitor is fully articulated, which experience has taught me is the most versatile type.
The set and see modules on top of the body and lens barrel are used for Prepare Phase actions, not squandered on Capture Phase adjustments.
Aperture is adjusted with the Control Dial. The rings on the lens are for manual focus and zoom.
All the buttons are larger, more prominent and more tactile (well they are Phillips head screws which actually serve well as buttons because they are easy to locate by feel) than those usually found on a small camera. But they are located so that none will be accidentally pressed while using the camera.
All the buttons are larger, more prominent and more tactile (well they are Phillips head screws which actually serve well as buttons because they are easy to locate by feel) than those usually found on a small camera. But they are located so that none will be accidentally pressed while using the camera.
In due course I will fully test a real LX100 and will run time and motion studies comparing the LX100 with the Mockup "LX102".
Update February 2015
Well, I did buy the LX100 and have used it extensively. At least I did until it suddenly stopped working a month ago. It is still in the repair facility waiting for a new motherboard or some such.
The LX100 user experience has been much as I predicted. Holding and operating could be much improved with a modern handle and control layout.
 |
| Looking at you, ergonomically |


Đăng nhận xét